Showing posts with label yummy. Show all posts

Saturday, 2 November 2013

Ultimate Choc Chip Cookies

Today we have our lovely friend Kim's  husband Brian guest blogging about his delicious Christmas cookies...

I found the recipe for these cookies in one of my favourite cook books, The River Cottage by Hugh Fearnley-Whittingstall. Not only are these the nicest cookies I have ever tasted but they are so quick and easy to make the whole family can get involved. I like to save these for Christmas Eve, however, they can be knocked up in a few minutes in order to impress unexpected visitors! 

Talk of Santa is beginning to fill the air in our house and when Corey suggested we practice making these for Santa I couldn't resist. They only take a few minutes to prepare and 10 minutes to cook, and trust me, when they are out of the oven they will be gone in seconds!!


What you will need is as follows:

125g Unsalted Butter
100g Caster Sugar
75g Soft Light Brown Sugar
1 Medium Egg Lightly Beaten 
2 Teaspoons Vanilla Extract 
150g Plain Flour 
1/2 Teaspoon Baking Powder 
A Pinch Sea Salt
100g Dark Chocolate Chopped Into Smallish Chunks (Corey loves his chocolate so we ignore the smallish part 😃)

Gently melt the butter in a small saucepan
Mix both sugars in a bowl, add the melted butter and beat well with a wooden spoon
Beat in the egg and the vanilla 
Sift the flour, baking powder, and salt into the bowl and stir them in
Then add the chocolate (If this has not already been eaten!)

You now should have a gooey mixture 

Now depending on how big you like your cookies, dot heaped dessert spoonfuls of the mixture on to baking sheets lining with grease proof paper. Make sure to leave a few cm between each one as these cookies really spread out. 
Place in a pre-heated oven to 190 degrees/gas mark 5 for 8-10 minutes until they turn golden brown. This seems like forever to Corey as he spends this entire time looking into the oven! 

Take them out of the oven, taking care not to burn yourself and also fighting off whoever happens to be in the kitchen at that time. Place the cookies on to a wire rack to cool. This is a pointless exercise in our house as they never get the chance to cool completely. 

Enjoy 

Saturday, 5 October 2013

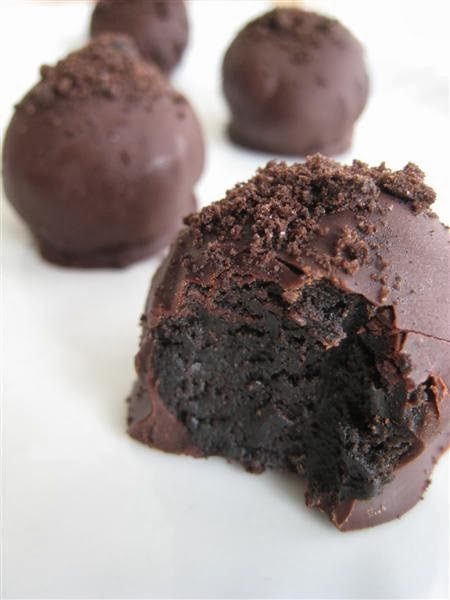
A Little Ball of Oreo Heaven

These truffles are literally to die for! Unless you dont like Oreos well then they are disgusting and you might want to just end your reading right here!

But if like me you LOVE Oreos then step right up because do i have a treat for you! Oreo Truffles!!


To quote Jade's Niece Jordan "Oh my god oh my god have you tasted these oh my god they are like chocolate goo, they are amazing"

They are super yummy and you can pop some in some little bags and they will make perfect little presents for people!

I found the recipe on sarahkoller.com via good old Pinterest and have made it a few times now, always delicious and theres no actual cooking involved whoop!

so heres the recipe, enjoy!

Love
L xx


Oreo Truffles
Makes approximately 4 dozen truffles (or maybe a little less, depending on how much of the filling you choose to sample)
1 pkg. (8 oz.) cream cheese, softened
1 pkg.  (1 lb. 2 oz.) Oreos (You can also use a generic version to save a little cash; I've tried a few varieties, and they work just as well.)
2 pkg. (8 squares each) Baker's Semi-Sweet Chocolate, melted (You will most likely use closer to 1 1/2 packages. That's more chocolate for spatula-licking, right?)
1. Set aside 5 Oreos and throw the rest in a food processor until they are finely crumbled
2. Thorougly mix cookie crumbs with cream cheese.
3. Form crumb-and-cream-cheese mixture into balls, approximately 1-inch across each (but don't worry too much about being exact here. They will come out delicious no matter the size!) and place onto a cookie sheet that has previously been lined with wax paper.
4. For best results, pop the formed mixture into the fridge for at least 15 minutes to chill while you complete the next step. If you really don't have the time, the truffles will still taste delicious (so don't worry!), but they will be more difficult to handle and some of the coating with mix with the filling.
5. Melt the chocolate. There are many ways to do this. I don't have a double boiler, so I just throw my chocolate into a saucepan and heat it on low, stirring frequently, until it is completely melted.
6. Remove pot from heat.
7. Coat previously formed balls with chocolate and return to the lined cookie sheet.
8. Throw the remaining 5 cookies into the food processor.
9. Sprinkle some of those crumbs on top of the (still wet) truffles.
10. Refrigerate for one hour.
You are done! You are now free to package, freeze, and eat. (Of course, you were free to eat during the entire process.)
Variation: swap out regular Oreos for Golden Oreos (semi-sweet chocolate for white chocolate, if you like white chocolate). You will end up with a cheesecake-like truffle.


Saturday, 14 September 2013

The King!


Tomorrow is Honey and Roccos Party - yippee!! I'm prepared for Rain or Shine!!

I was going to post today about the perfect Father Christmas cookie - however as i did Halloween yesterday i thought id hold my horses and keep the cookies for December!!!

Sooooo what culinary delight are you going to read about today??

Elvis - the one and only!!!

The Elvis Presley Fried Peanut-Butter and Banana Sandwich!!!! taken from Nigella Bites

oooooh this is good - makes my mouth water!!! This is the perfect sandwich for a hangover, bad day, need stodge kind of day!!!

Ingredients:

1 small ripe banana
2 slices white bread
2 tablespoons smooth peanut butter (not extra smooth)
2 tablespoons butter

Method:

Mash or slice the banana.
Lightly toast the bread, and then spread the peanut butter on one piece and the banana on the other.
Sandwich together then fry in the butter, turning once, until each side is golden-brown.
Remove to a plate, cut the sandwich carefully in half on the diagonal and eat!

Serves 1 and believe me you won't want to share!!! Please try this at home!!!

In some recipes on line they also include cooked streaky bacon as well!! mmmmm


Enjoy
J xxx


Saturday, 6 July 2013

Lovely one dish Chicken

This dish is a firm family favourite!!! I love making it as its simple and not much washing up!!!

"Crispy and sticky chicken thighs with squashed new potatoes and tomatoes"
by Jamie Oliver, Jamie At Home


Ingredients: (serves 4)

800g new potatoes, scrubbed
sea salt and freshly ground pepper
12 boned chicken thighs skin on (i use breast too)
Olive oil
600g cherry tomatoes different shapes and colours
A bunch of oregano
Extra Virgin Olive Oil
Red Wine Vinegar


Put the potatoes into a large saucepan of salted boiling water and boil until cooked.

While potatoes are cooking preheat your oven to 200C/400F/gas6.  Cut each chicken thigh into 3 strips and place in a bowl.  Rub the meat all over with olive oil and sprinkle with salt and pepper, then toss.  Heat a large frying pan, big enough to hold all the chicken pieces snugly in one layer, put the chicken into the pan skin side down.  You can do in batches if your frying pan isn't big enough.  Fry over a high heat for 10 mins or so, until almost cooked, then remove to an oven proof dish.

Prick the tomatoes with a sharp knife.  Place them in a bowl, cover with boiling water and leave for a minute or so.  Drain and, when cool enough to handle, pinch off their skins.  You don't have to but this makes them really sweet and the flavour will infuse the potatoes.  By now the potatoes should be cooked.  Drain them in a colander and then lightly crush them by pushing down on them with your thumb.

Bash up most of the oregano leaves with a pinch of salt in a pestle and mortar (i use dried oregano and just sprinkle over the dish.  Add 4 tablespoons of extra virgin olive oil, a good splash of red wine vinegar and some pepper and mix it all up.  Add this to the chicken along with the potatoes, the tomatoes and some more oregano leaves.  Mix everything carefully and lay it all out so its on a single layer on a roasting tin and back for 40 mins in the preheated oven until golden.

This is lovely served with rocket salad!!

My children love this and my husband always asks for it!!! Winner winner Chicken Dinner!!!

Love
J x

Follow us on Bloglovin & Twitter

Saturday, 29 June 2013

Magical Soup

After eating my own bodyweight in food every day on holiday i gained 1 million lbs, and no im not exaggerating my jeans on the plane home were crying they were stretched so much! So back to the diet we go.

I was looking for a smoothie maker online so i could have a healthy smoothie for breakfast every day (well probably for 3 days then it will gather dust in the cupboard) when i spotted a soup maker!! Yes you are reading that right an actual machine that makes soup all by itself!

I LOVE homemade soup but its just such a faff to make so i was literally giddy when i saw it, and added bonus it was half price at Curry's, which obviously means it was meant to be.


I thought this would be brilliant for dieting too! Lots of healthy fresh veg soups, low in calories and also a good way to get extra veg into the children. So i used my soup maker for the first time today and i am super duper impressed! Soooo easy to use. 

I used an old soup recipe i used to make the traditional way before my super soup maker entered my world. This yummy spicy butternut squash soup will make 4-6 servings depending on your bowl size and its just 83 calories for a larger portion!

1 Butternut Squash
2 med Onions
1 Red Chilli deseeded
1 Vegetable stock cub
1 1/2 pints of water
Pinch of salt and pepper 

All you do is chop up your vegetables


Pop them into your soup maker along with the rest of the ingredients.


Then set your soup maker to the desired soup you want i wanted a smooth soup and that takes just 21 mins to make.


When it starts it sounds like a kettle boiling and i was listening to it blend and it didn't seem like it blended an awful lot so i was expecting a slightly less smooth soup than i usually like but when i lifted off the lid....


Ta Daaaa Perfectly smooth soup in just 21 mins and only one thing to wash up! Amazing!!


It tasted just as delicious as always too. I am so impressed with this and think it will be such a great addition to our kitchen and will really help with the diet too! Me and Jade will be keeping you up to date with our dieting results so be sure to pop back and see if the soup maker helped! In the meantime get yourself off to currys for a soupmaker whilst they are still in stock!

Love
L xx

P.S Pretty please follow us on Bloglovin or Twitter

Saturday, 22 June 2013

Banana Bread Bonanza !

Happy Saturday!!!!

Last Sunday my husband went to golf early doors and woke the whole house up looking for things (does this sound familiar?) So up we all get pre 7am and i'm thinking right what can we do to make this morning go a bit quicker?
I wonder if there is anything i can make with those 2 brown bananas in fridge that no one will touch?

So i googled and came across a lovely Banana Bread recipe from The Hummingbird Bakery!

We happened to have most of the ingredients except the light brown sugar so i used caster sugar as the point was to have fun and not make a culinary delight!

So Honey (age 3) dons her apron and get busy cracking eggs and mixing ingredients! It was super easy and she really enjoyed doing all of it! I had it warm with butter and Earl Grey and my nieces had it for dessert with Ice Cream - it really was yummy


Enjoy 
J x 

Banana Loaf

Makes 8-10 slices
Ingredients
270g soft light brown sugar
2 eggs
200g peeled bananas, mashed
280g plain flour
1 tsp baking powder
1 tsp bicarbonate of soda
1 tsp ground cinnamon
1 tsp ground ginger
140g unsalted butter, melted

A 23 x 13-cm loaf tin, greased and dusted with flour
Preheat the oven to 170oC/325oF/Gas 3.

Put the sugar and eggs in a freestanding electric mixer with a paddle attachment and beat until well incorporated. Beat in the mashed bananas.

Add the flour, baking powder, bicarbonate of soda, cinnamon and ginger to the sugar mixture. Mix it thoroughly until all the dry ingredients have been incorporated into the egg mixture. Pour in the melted butter and beat until all the ingredients are well mixed.

Pour the mixture into the prepared loaf tin and smooth over with a palette knife. Bake in the preheated oven for about 1 hour, or until firm to the touch and a skewer inserted in the centre comes out clean. Leave the cake to cool slightly in the tin before turning out onto a wire cooling rack to cool completely.

LinkWithin

 photo bloglovinicon_zpsef14aa26.gif  photo twittericon_zps10c57144.gif photo instagramicon_zpsd1a2ba40.gif